Whether you're using wireless microphones or in-ear monitors (IEMs) for a concert, a house of worship band, or a corporate event, the performance of any wireless system ultimately depends on the local RF conditions and the analog backbone you use to manage it. Even the most expensive wireless systems—even those using “factory-labeled” antennas—can still suffer from common issues. And now with more devices competing for less spectrum, there’s even less room to risk it. That’s where RF Venue steps in.
Our specialized antennas and antenna distribution systems are designed to make wireless mics and IEMs work and sound better in any environment. The RF Venue team continually rolls out practical education on complex topics alongside a product line completely engineered to help eliminate guesswork, enhance wireless reliability, and help remove the mysteries of RF. Dive in with RF Venue Live Q&A Webinars.
In this post, we’ll walk you through the process of going from spec to deck—how to design, order, and install the right RF Venue accessories for wireless microphones and in-ear monitors (IEMs) in the most common venues and environments. Check out our Product Matrix for a really quick overview of RF Venue.
Step 1: Spec it Right
Before you buy anything, get to know and understand your system so you can map out the configuration you want. Including:
A: Your Venue Size and Layout
Are you installing a system for a 50-seat church or deploying a multizone array with 72 channels in a 68,000-capacity arena? (Example: RF Venue CP Beam Antenna at the Tokyo Olympics) RF Venue has antennas designed to handle any application. Near-field coverage (100 to 200 ft) and far-field coverage (300 to 600 ft). Need to cover multiple rooms? No problem with our 4ZONE antenna combiner. Line of sight, cable lengths, and physical obstructions all matter when planning RF distribution. Need help? Just reach out and we’ll review any challenging projects. RF Sound Check: Free 30-Minute Tech & Design Support.
No matter what venue you are operating in, RF Venue has a solution that fits your application. Just check Solutions By Venue.
B: Channel Count and Frequencies
How many wireless mic or IEM channels do you need or use? What model and brand? As long as your UHF wireless units have removable antennas, they can be upgraded by RF Venue accessories. Make sure to check the frequency ranges of your wireless units to ensure operation compatibility in your exact location. Our Wireless System Builder will help you do this.
C: Existing and New Wireless Equipment
Inventory your existing gear. Do you already own Shure, Sennheiser, or Audio-Technica receivers? Or any other brand? Are you planning to upgrade this year or next with more? I always ask customers if they are planning yearly upgrades, because you need to be prepared. RF Venue’s accessories are brand-agnostic and work across all wireless brands, so it doesn’t matter how or when your system grows, just start with the right upgrade pack for the right coverage and channels you need. Expand with more DISTRO systems now or slowly to scale as you grow. Using RF Venue allows you to mix wireless brands together, even different wireless frequency bands on the same antenna system. Keep it simple and focused. Just go to Wireless System Builder to configure your equipment.
Need more help after that? Follow the RF Venue design checklist and email the info to info@rfvenue.com for a free consultation with one of our applications engineers.
Step 2: Choose the Right RF Venue Accessories
All RF Venue products are designed to solve wireless problems and help you navigate all wireless projects and live events seamlessly. Here’s a guide to managing it:
For Managing Multiple Wireless Microphones:
-
DISTRO4, DISTRO5 HDR or DISTRO9 HDR: Any antenna will work with RF Venue antenna distribution systems, just as RF Venue antennas work with anyone’s distro systems. Antenna distribution allows you to share one pair of antennas among multiple receivers, removing the multiple low performance factory antennas to eliminate avoidable antenna farms growing year-over-year, as you add more channels. All distribution systems are available in bundles with Diversity Series antennas for simplified ordering and zero guesswork. Learn more about RF Venue Antenna Distribution with our Antenna Distribution Matrix.
-
Diversity Series Antennas: Diversity Fin and Diversity Omni stand mount for portable use with live events, or Diversity Architectural for improved aesthetics in installed systems for wall/ceiling mounting. All designed specially for wireless mics. With only a single unit to position or install, you will save cost from having to buy two separate antennas, and as well as time on the install (and/or setup and breakdown). Because RF Venue Diversity Series Antennas have both A and B antennas in a single unit, they greatly reduce dropouts from multipath interference and totally eliminate dropouts from movement (signal fades in both of your antennas). Wireless mics are held by people moving around, right? Freedom of movement is the entire point! Learn more about RF Venue Antennas with our Antenna Matrix.
-
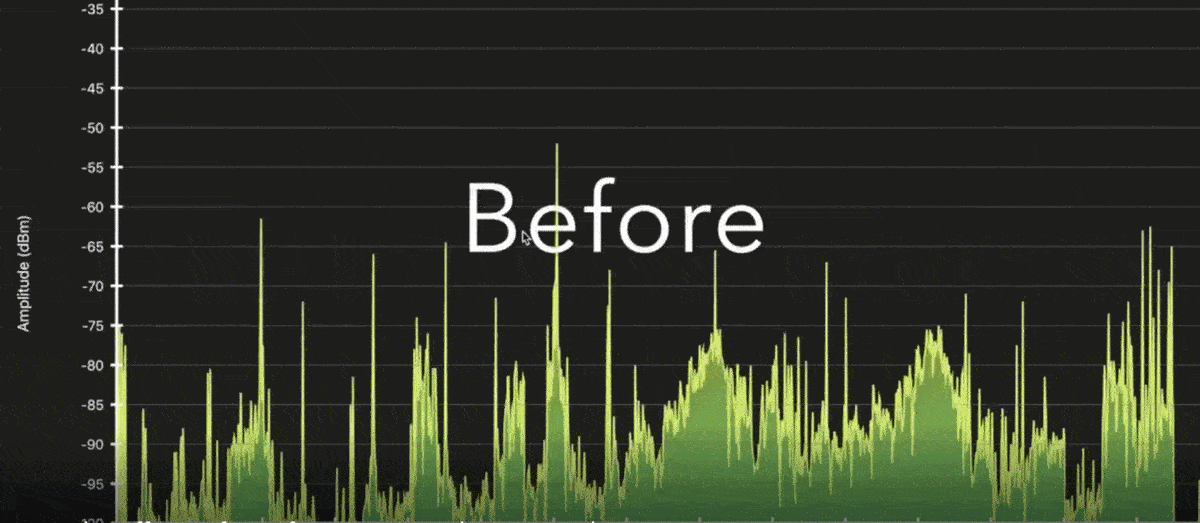
RF Venue band-pass filters: Add two Band-pass filters to the A and B antenna lines to help eliminate out-of-band signals that can “distract” the wireless microphone receivers from capturing your signal. These will protect against common interference types caused by nearby LED lighting, video walls, and switch-mode power supplies. They will also reject 5G cellular signals, which can create havoc with wireless mics/IEMs any time a large group of people bring them into your venue. Rather than ask your audience to use Airplane Mode, block it out with 40 dB of rejection. Read about 5G Cell Phones vs Wireless Mics and check the before and after BPF Comparison GIF.
-
RF Spotlight Antenna: Got a serious interference and noise issue and cannot find any open channels? This is the only antenna that will work to solve the issue! We hope you don’t have this issue, but if you do, the RF Spotlight is the only solution. Use two RF Spotlight antennas for diversity reception, placed 6 to 30 feet apart. For best results, keep your coax cables length to 50 feet or less, unless you use lower-loss cable like LMR-400 or Ecoflex-10. Watch the demo video: Goodbye Interference and read more about the success of the RF Spotlight setup at Prestonwood Baptist Church.
For Managing Multiple In-Ear Monitors:
-
COMBINE4, COMBINE6 HDR or COMBINE8: These units combine multiple IEM transmitter outputs into a single antenna. This approach minimizes RF noise and interference and focuses the coverage to your stage, reducing dropouts. All are available singly or bundled in one package with CP series antennas as well as the cabling you need. Learn more about IEM combiners with our Antenna Distribution Matrix.
-
CP series antennas: CP Beam, CP Stage, and CP Architectural antennas are circularly polarized to help minimize dropouts and increase range for IEMs. Targeted coverage at ranges of 600 feet or more with CP Beam, and wider 200 feet near-field coverage with CP Architectural and CP Stage providing lower minimum distance. The new CP Stage is an affordable, lightweight, ultra compact, IP44 outdoor rated “phenom”. Get to know RF Venue CP Antennas in depth with the CP Antenna Matrix.
Tips and Tricks from Top RF Engineers and AV Installers:
Need additional range with wireless mics? Use two high gain CP Beam antennas. Find out how In Phase Productions does this at the RattleTrap Hot Rod Event.
Using mics outdoors and need to permanently install antennas on the exterior of a building? Use two IP44 outdoor rated CP Stage weather-resistant antennas. To mount them; Some customers use this hardware product.
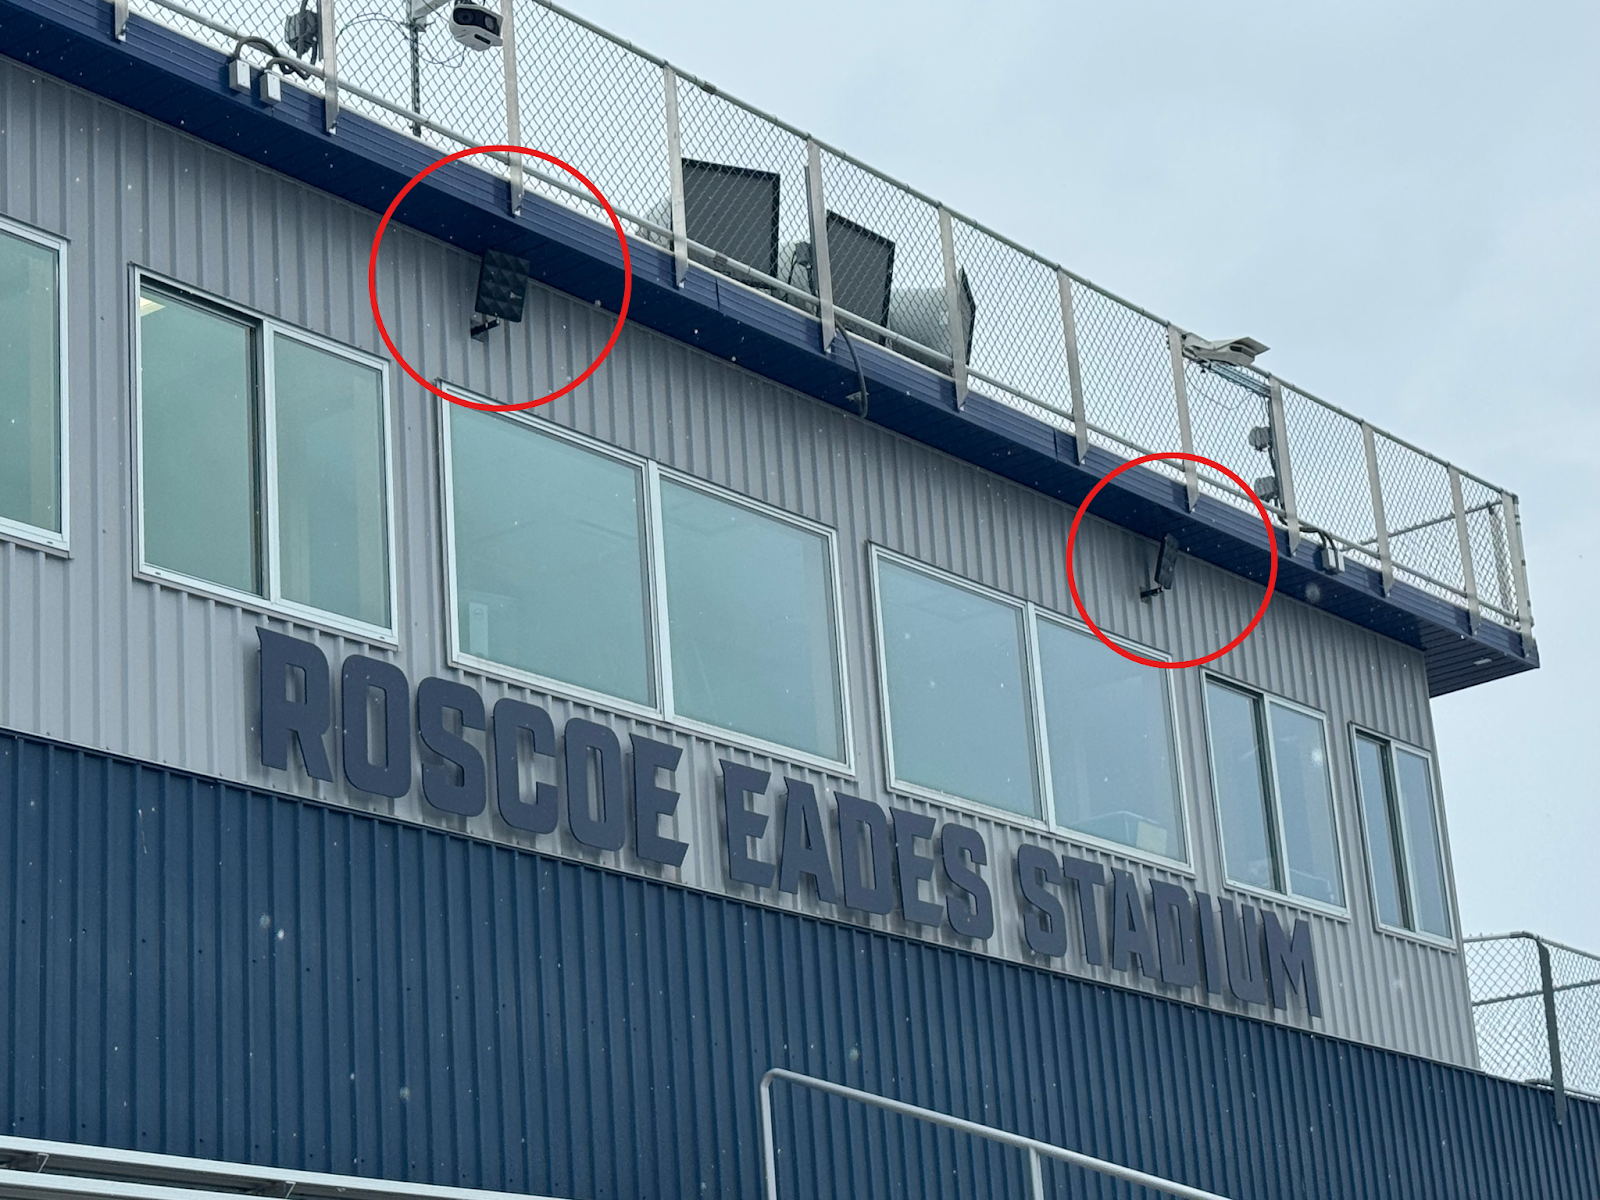 Image and Installation done by Top-Notch Productions, INC
Cables and Mounting:
-
With Diversity Series antennas for mics, run two coax lines to the single antenna position or zone. With CP series for in-ears, run one cable. Use shortest possible cable runs, and low-loss coaxial cable (like RF Venue’s double-shielded RG8X) for runs up to 100 feet. At lengths of 101 to 250 feet, we often suggest using LMR400 coax, as it has the same loss at 200 feet that RG8X has at 100 feet. For runs greater than 250 feet? Avoid potential issues and the need to hire technicians to pull bulky wire through tight installation spaces.. For wireless mics, use OPTIX Series 3. To learn more, download our eBook RFoF Basics.
- Plan out your antenna placement: Elevated above the heads of people and line-of-sight is best. 6 to 10 feet above the deck. Wall mounts or common mic stands adapters work well for most antennas but we have permanently installed architecturally invisible antennas available too. You can now avoid improvised setups.
Check out our new eBook on this seemingly complex, but ultimately simple subject
Step 3: Order with Confidence
Once your system is specified properly:
- Contact RF Venue for Dealer Direct Sales to help with pre-sale support, or price quotes.
- Not a dealer, installer or system integrator yet? Sign up here and let us know how your company installs wireless mics and IEMs.
- Need help to locate a trusted reseller or installer in your location? Just use our Find an Installer location tool.
- Everything is in stock, so you won’t need to wait for equipment to get the job done. No wireless project is left behind with RF Venue.
While you're at it; ask for a site-or-job-specific consultation from our team if your project or venue has some specific RF challenges. Just send us your project to review.
Step 4:Install and Test
A. Mount Antennas Strategically
Avoid placing antennas behind LED walls, metal structures, or too close to each other. Here are the basics;
- Run two coax lines for each diversity zone needed.
- Mount or position a Diversity Series Antenna at 6 to 10 feet off the ground. (remember going too high can also make you more prone to TV interference).
- Separate any additional antennas by at least 6 feet apart to avoid interaction.
- Place CP Series Antennas facing the performers from a front corner of the stage for IEMs.
- Don’t point your mic (receive) toward your IEM (transmit) antennas. Mount or position them facing the same direction.
Tips and Tricks from Top RF engineers
The CP Beam has an isolated backplate so it can be mounted directly on a truss rod or metal pole without a problem, or even 2 inches back-to-back with another CP Beam!
B. Use Proper Cabling
RF Venue offers pre-made RG8X cables in all standard lengths. Our cables are double-shielded, which reduces interference. Always route coaxial cable cleanly, avoiding power cables or LED lighting lines to minimize interference. Don’t coil excess cable—use the least amount of length possible in every situation, and try to avoid any amplification in the line, (such as our In-Line Amplifier) unless absolutely necessary with longer, more lossy cable runs. Need to test cables? The new RF Explorer Pro has a cable tester which helps to ensure you are using a working cable.
C. Power It Up
Wherever compatible with your receivers; connect the distro’s DC output, (the DISTRO5 HDR and DISTRO9 HDR use Anderson PowerPole connectors that accommodate the DC-OCTOPUS cable) Or use the new OCTOPOWER for power to ensure a clean, neat rack with no wall-warts).
D. Scan, Scan and Scan Again
Use RF Spectrum Tools to scan the environment and assign clean frequencies. RF Venue tools don’t replace frequency coordination—they enhance it. With tools like RF Explorer Pro and Spectrum Recorder, alongside Wireless System Builder, you can be sure that Frequency Coordination won’t be a mystery to you or your technical team anymore.
Step 5: Optimize and Train
After installation, perform real-world tests:
- Walk-test mics across the performance area.
- Have a performer use the mics and IEMs in various stage locations, testing usable range, and potential interference.
- Train your team or volunteers on how to troubleshoot basic RF issues. With some simple education, users at any level can become RF experts.
If interference issues persist, tools like RF Venue’s RF Explorer Pro or Spectrum Recorder can help diagnose interference problems on-site and over time (since local RF Activity is constantly changing).
Final Thoughts
Integrating RF Venue gear into your wireless system isn’t just an upgrade—it’s peace of mind. From multi-mic setups in touring rigs to fixed installs in churches, RF Venue’s accessories ensure your wireless audio performs reliably when it matters most.
So the next time you’re planning a wireless system, remember: spec smart, install right, and let RF Venue help make it effortless.


